Sunday, February 24, 2013

Seminar on Getting Into Print...Electronically

The February 16th seminar I presented at Muncie's Kennedy Library brought together ten people who have written or plan to write a book or article they want to publish. Some had explored self-publishing electronically, several were new to the idea, and at least one has a book in paperback that they believe would translate well to electronic format.

We talked largely in terms of how to format a book for Kindle, since Amazon has more sales than any other site. We did touch on Barnes and Noble and Smashwords, in part because BN did a signing for my first book many years ago and in part because the Smashwords Style Guide is easy to read. I do find BN's upload screens much easier to follow than Amazon's.

I'm meeting with at least one class participant soon to go over her specific publishing project. She has that essential ingredient many writers sometimes lack -- a completed project.

I plan to do the seminar for other libraries, though I don't expect other libraries' staffs to be as attentive to a presenter's needs as those at Kennedy Library. I had never done a Power Point presentation, and they helped me learn. See, older dogs can learn new tricks, whether it's electronic publishing or not.
                                                                           *     *     *     *     *     *
 Check out Elaine's web page or sign up for her newsletter


Tuesday, February 5, 2013

Publishing an Electronic Book - Part II

Have you ever opened an ebook and come across odd type fonts that appear in the middle of a page? You might be surprised to know that an author may not see these in their computer file -- they are only visible in the online previewer (when the book is loaded to Kindle, via Amazon's KDP, or another online retailer).

Taking Out the Formatting

Rogue text and spacing can be avoided by taking formatting out of the computer file and reinserting it. Once a book has been taken through the "no formatting" step (using a a program such as Notepad in Microsoft Word) then you can begin to put the formatting back into the book.

If you skip the "take out the format" step you could spend hours trying to fix an uploaded book file. And you may never fully fix it all, so your book will look...weird.  And it will annoy readers.

For info on taking out formatting, go to this post.

After you take the formatting out using Notepad (or whatever), you select the book, copy it, and put it back into your word processing program.

After you take the formatting out of a book try to work on it on just one computer -- the one you used when removing the formatting. I'm no technology guru, so I cannot tell you why transferring the file to another computer (or different word processing program) can mess it up, but it can.

Always remember, computers are dumb. They can only do what you tell them to do, which is why you need to provide good instructions.

Word Instructions to Reinsert Formatting

Save your new file in Word 97-2003 form (doc vs. docx). You can do this in later versions. It will not be obvious to the author that they are working in the older format.

Word 97-2003 does not have all the bells and whistles of newer versions, so it does not "mess with"
your manuscript as much as newer versions.

Here are specific steps.

1) Make a copy of your file and work on that copy. Never work on your only copy.

2) If you have not already done so, make your document single-spaced and take out all spaces between paragraphs EXCEPT paragraphs that separate two scenes. (Yes, it takes awhile. You have to do it or you'll only get about ten lines per page on the e-readers.)

3) If you still have tabs, take them all out. Do this by doing a "find and replace."  In the find you will put ^t --the symbol for a tab. (The carrot is usually above the 6 key). In the replace put nothing.  Use "replace all." Eek! You have no way to tell if it's a new paragraph. No worries, keep reading.

Now you are ready to create the basic "style for your book."

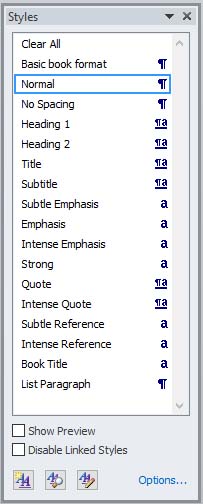
4) From the tool bar, click on format and select "Styles and Formatting." You see a column on the right.

5) The white rectangular box at the top of the column needs to say "normal." If it does not , look at the top left of your toolbar.  You'll see "AA" and next to that another white box. Click the down arrow and select Normal.

6) Back to AA at the bottom of "Styles and Formatting." Right click and click on "New Style."

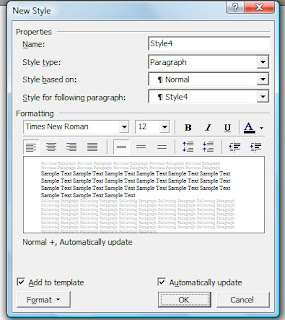
7) In the top white box that appears, name your style, something you will remember, such as "book format" or basic book format.

8) Style type will remain "paragraph."

9) Style will remain based on "Normal."

10) Leave as "Style 1" in style for following paragraphs.

11) Below where it says "Formatting" is a box that shows the font you will use.  I suggest something simple like Book Antiqua or Times New Roman. Leave fancy styles for your cover.

12) Font size does not matter too much, since an e-reader can make text bigger or smaller. I use Book Antiqua 11.

13) At the bottom put a check in "Add to template" and "Automatically Update."

14) At the bottom left, click on the tab that says "Format." The second item in the list that appears will be paragraph.  Click on that.

15) At the top of the paragraph formatting box, make the outline level "body text" and alignment "justified." (Left justified looks sloppy in an e-reader, but it's your choice.)

16) Leave all zeroes for the "indentation" and "spacing."

17) Under line spacing make it single and leave the white box next to it white.

18) "Special" -- use the drop down arrow and select first line.  To the right, I suggest .3 for the indent amount. (Your choice, but on an e-reader .5 looks huge.)  Now the reader can see your paragraphs.

19) Click Okay (at the bottom).  This take you back to the "New Style" screen, shown above.

20) Click Okay (at the bottom).

21) The blue box will disappear and on the right the style and formatting menu will now have a style with the name you just gave your style -- book format or whatever.

Here is where all of what you just did is worth it.

22)  For practice.  Select (highlight) a few paragraphs and click on the style you just created.  The paragraphs you selected will be indented .3 (or whatever you chose) and will have the font you selected, etc.

Now what?

You have a choice. I select the entire book and click on whatever I named the book format style set. Then SAVE the book, maybe giving it today's date.

Then I add back centering for chapters. I add back centering by selecting the line of the chapter head (or anything else) and then click "clear formatting."  Then I highlight the chapter heading and select center and the font size I want.

I add bold and italics by selecting the text and clicking on bold or italics, as in any document.

Adding bold and centering this way DOES NOT always work well, but 99% of the time it does.

Mark Coker, who wrote the Smashwords Style Guide, suggests that you create a few more new styles, just as you did for your basic book format.  For example, for a chapter name, a style might be centered, a slightly larger font, and bold.  You would then select the chapter name and click on that new style, which you might have named "Chapter Name" (or something like that).

My guess is that for newer versions of Word it is more important to create the separate styles, and it only takes a minute once you have done it for the first time. You could create a style called "front page matter" and have it centered, and in a different font. You can create 25 styles if you like.

Is this tedious as all get out? Yes.  Be assured it takes less time than not doing this. And you are a publisher, so you cannot expect it to be a total piece of cake.

After doing this, you should have a file you can upload and have few problems with. The good thing about uploading to sites such as Smashwords, Kindle (Amazon), or Nook (Barnes and Noble) is that after you upload they give you a simple way to page through your book as it will look on the e-reader. This is not a time to proof (you did that already), but it does let you see if you have extra spaces somewhere, or an odd font.  You can fix that and reload the book.

One final thought. When you load to Kindle or Smashwords (which puts your books on Apple, Kobo, and other sites) you can have page breaks between chapters. If you load directly to Nook Press (the Barnes and Noble publishing site) you can only use section breaks.

Do You Really Have to Do All This?

Maybe not. Amazon continues to improve its processes, and I have tried loading files without doing all these steps. I start by saving the file in Word 1997-2003, removing tabs, and replacing them with indents (using the paragraph formatting guides described above).

My caution would be that there can still be rogue formatting errors, which will appear when you preview the text in the Amazon previewer. You can correct these and reload.

The reason I still do the full process described here is that you don't know what those rogue formatting errors will be, or which you don't see. The process described here will take only an hour or two (depending on the book's length), and when you are done the book has no formatting errors.

Onward and upward. (This post was updated in 2017.)
                                                      *     *     *     *
Check out Elaine's web page or sign up for her newsletter

Thursday, January 24, 2013

Publishing an Electronic Book - Part I

As I prepared to teach a free seminar on ebook publishing at Kennedy Library in Muncie, Indiana, I outlined the processes I used to get a 'clean' ebook.

After beating myself over the head for the better part of eighteen months to do my own ebooks, I had learned a lot.  It's probably about three percent of what there is to know, but it's the three percent that will get your books uploaded in a good format, ready to sell.

This is the first of a series of articles about the process. Toward the end of the series I'll talk about how to get people to buy your books, but early on that should be at the back of your mind. Of course you want people to buy them! But if they are not ready to sell (content and format) you might get a few sales, but there will be no repeat customers or word-of-mouth sharing about your book.

The points below deal with books that are text, except for the covers. I am also using a PC, though the concepts would apply to formatting a book using an Apple product.  In case you are wondering, YOU do not need to worry about formatting beyond what it presented here.

Online publishers called 'aggregators' will convert your book to work with various ereaders. That means you will load your work to their web site and they will put it in all formats (epub, mobi) for you--for free.  Two popular aggregators are  www.smashwords.com and www.draft2digital.com. But, don't get ahead of yourself.

1)  Finish your book 100 percent before you start formatting for an ebook.  That means you have written it, given it at least a few weeks to settle so you review it with a fresh eye, read it with a cold eye, made revisions, and had someone else proofread it. Sound like a lot of extra work? If you want people to spend money on your books, you need the best possible product.

 Why? Because you only get once chance to make a first impression.  Done? Okay, what's next?

2) Take that beautifully written book and make an electronic copy of it. Save that copy in a different folder (or a flash drive) so you do not lose it or get mixed up about what copy you are working on. (You should always have a copy away from your computer. I email myself books as I work on them and when done.)

3) Using the copy, get rid of all the formatting.  What?! If you do not do this, you will have no end of problems with the copy you upload to Smashwords, Barnes and Noble, or Amazon.  There will be crazy fonts, even symbols, in the middle of your text. If you try to remove these manually you will do it over and over again, and will spend far more time (and still have it wrong) than if you simply take out all the formatting and reinsert it.  How do you do that?

4) Copy your entire book.  In Microsoft Word (which can be the friendliest program for this) you do 'select all' and then copy.  You put this version in Notepad.  Notepad comes with every PC and basically has no formatting capabilities.  When you paste your book into Notepad it will look awful.  However, any formatting that could mess up an electronic copy will be gone. You do not have to save a copy of the Notepad version, but I do.

5) In Notepad, use 'select all' again and copy.

6) Open a totally new document in your word processing program (preferably Word 97-2003).  Paste the unformatted book into Word. If you have a later version of Word, save this new document as a doc, not a docx.

Below is a summary of instructions. For details and graphics, go to Part II of this series.

7) Turn off all automatic formatting.  In Word 97-2003 you click on the tools tab and then on autoformat. You will see lots of boxes checked.  Uncheck all of them. Then click on autoformat as you type and do the same thing. Make sure you click on 'apply' so you save changes. You do this because you are actually smarter than the computer.  You do not want it making any decisions about how your document should look.

(In later version of Word, Click on the colorful Microsoft logo, usually at the bottom left. Then go to Word Options, Proofing, Autocorrect.  At the bottom of this post you will see a link that will give instructions for these later versions of Word.)

8) Now you will reinsert all formatting using the Styles and Formatting menu. I'm going to list a couple of things to do.  There are more.  We'll get to that. Remember, whatever word processing program you use will permit you to do any of this, you just need to explore how. If you do not know how to do something, or my instructions seem unclear, use the Help program.

a)  Make sure you can view the standard and formatting toolbars. In Word 97-2003, click on view and toolbars.
b) Change the document to Normal style.  (Top left of page, usually.)
c) Take out all spacing between paragraphs. This will take awhile, but you have to do it because keeping spaces will make your book hard to read on an e-reader such as Kindle or Nook. Trust me. I leave an extra line between scenes.
d) The next instructions look like a lot, but they take almost no time.  Practice on a document other than your book, if you like.

Select (highlight) one line in your book.
Click on format, then styles and formatting. A long box opens on the right.
Click on new style (at top).
A box opens and you name your style in the top white space. I call mine Book Format

The box below says style type:  make it paragraph.
Then style based on: select Normal
At the bottom right is a box you click that says automatically update.  Click it.
At bottom left it says format. Click on that and select paragraph.
Then you do this:
Alignment is justify,
Outline level is body text.
Make sure these things are all zero: indentation and spacing, all boxes.
On the right it says Special.  I make that first line and .3 (paragraph indents, for fiction)
Click OK at the bottom.
Click OK again.
The line you selected (highlighted) has this format.

e) Here's the easy part.  Now that you have done this, you can select your entire document and click on the format you just created.  It will be on the right, with the name you called it. Wait, you say, I want some things centered.  You can select one paragraph (or ten) at a time, but since most of your book will be in paragraph form, it may be easier to center a chapter title than to do all the paragraphs/pages separately.
f) Whew!  This will take a lot of time.  Just pour a cup of coffee or tea and take your time.  If it is more boring than you can stand, take a break.

In the next post, I will tell you how to put back in centering, and bold and such.  In the meantime, be assured I'm not a genius. (You've already figured that out.)  I learned all this through trial and error and the Smashwords Style Guide, by Mark Coker.  It is very wordy, but Mark has an irreverent writing style, so you don't usually mind.  If you cannot wait until the next post, click on the guide and download it as a pdf document.  Do not try to read it all at once.  Much of it you do not need for a book of text.

There are also style guides at other sites. The Smashwords Guide is generic, and works for all.

Finally, before you do all this, make sure you proof your book! Sure, you can always make corrections, but you want to stop with the best copy you can produce.
                                                         *     *     *     *     *     *
 Check out Elaine's web page, sign up for her classes, or receive her newsletter.


Tuesday, January 8, 2013

Those Pesky New Year's Resolutions

Procrastination is my favorite hobby. You can tell because I'm writing this on January 8th instead of January 1st.  When it comes to writing I tell myself I'm mulling things over. That's probably ten percent true.  Maybe even twenty five; I was never great with math.

I have long since figured out that I delay starting or working on a longer project simply because it seems daunting.  When it comes to house or yard work I have learned to do a little at a time and it's better to start before the dust balls hide the cats or the ground is too frozen to plant tulip bulbs. Why not some writing projects?

There are files in my drawer with writing ideas going back to the 1980s.  I read through some of them a few weeks ago and they are so old I cannot remember writing the first few pages or short outlines--and I like them.

Nonfiction?  No problem, especially if it's a paid project. But even then, there is one I have worked on for years (it talks about worrying less and has an appealing title) and it looks as if this will be the year it will get done.  Not because I thought 2013 would be  the best year to release it.  Because I have finally parked my tailbone in the chair and said I can't get up for an hour.  And I do this at least a couple of times each day. So, maybe...

There is a final incentive to overcoming the I'm-not-sure-I'm-ready-to-tackle-that-project perspective. Money. You can actually publish something yourself and people will buy it--assuming it's good. That has not always been the case.  Publishers are good gatekeepers for readers. There is a lot of really bad writing that has never shown up in a book store. Now it may be on Amazon or Barnes and Noble.  But guess what?  No one has to buy it! Readers can assess your book or article and decide whether to add to their electronic or paper pile and procrastinate about reading it. They can even return ebooks with the click of a mouse and get their money back.

This is wonderful.  My long-term career as a government analyst or congressional aide has merged with my fiction career--it's democracy in action.  The idea that I can write what I want and see a financial reward in a reasonable time means I should probably chain my tailbone to that chair.

So, in 2013 you will see a greater mix of fiction and nonfiction projects.  I hope people will want to read them.  Last year, 8,500 people bought my books.  Bestseller status?  Nope.  Does it make me happy?  Yep.  Fulfilling New Year's resolutions can bring you joy.  Especially if you don't wait.
                                                                         *     *     *     *     *     *
 Check out Elaine's web page or sign up for her newsletter

Monday, December 31, 2012

"C" Words for Crime Shows

I was considering the title for a new project and my mind wandered a bit.  It's an occupational hazard. Think of all the fictional crime shows that begin with the letter C.
  • Crime Scene Investigation (CSI) and its various offshoots
  • Criminal Minds
  • Cold Case
  • Criminal Intent (a Law and Order offshoot)
  • Car 54 Where Are You? (OK, a comedy mostly and I'm dating myself)
  • Castle
  • Columbo
  • Cagney and Lacey
 Makes you wish you had a psychology degree.  It also means I'll shy away from the word 'crime' in a title. If you know more C shows, feel free to add to the list.

Saturday, December 15, 2012

That About Covers It

Every article or book on marketing your work says some of the same few things, starting with write something worth reading and followed by use a really good cover designer.  For some I've done the cover myself.  On one you can't tell but others you can.  So, after I'd sold a couple thousand books I began working with a wonderful cover designer named Patty G. Henderson, who does covers for a number of indie writers.

Sales immediately rose when she redid the cover of Appraisal for Murder, and I truly believe it is her cover that draws people to Any Port in a Storm, which is now the biggest seller of the Jolie Gentil series.

Now that the four books have been on sale for awhile I find that the second book (Rekindling Motives, which I loved writing) generally sells five to ten percent fewer copies and has the fewest reviews.  Why?  Look at these four covers.

What's the difference?  Drumroll...dark colors for Rekindling Motives.  The designer (Miss Mae -- also really good to work with) developed a cover along the lines we discussed.  What this reinforces is that the best way to let cozy mystery readers know that a books is not a police procedural or something dark is to have cheerful-looking covers. If the readers wanted gore they'd go watch a CSI episode with bugs.

This is not rocket science, but it was instructive for me. So, as I work on Trouble on the Doorstep, I'm thinking yellows and blues are good.  And they'll be needed to convey a light tone, as the books opens with a short scene during Hurricane Sandy. It is the Jersey shore, after all.  And the resilient spirit of those in the New Jersey beach towns is reflected in the book, which will be out in early 2013.
                                                         *     *     *     *     *     *
 Check out Elaine's web page or sign up for her newsletter


Tuesday, November 27, 2012

Help for Mind Numbing Marketing

By Elaine L. Orr

I read a lot of articles and occasionally books on marketing ebooks.  I'm just starting to get more serious about paperback marketing.  Nearly every author shares what works for them.  I guess we're kind of like the 40,000 Musketeers. What I follow most consistently is the work of Dana Lynn Smith, the Savvy Book Marketer.  Her free monthly newsletter has many tips, and I have bought a couple of her publications -- very reasonably priced. 


At my request, Dana agreed that I could reprint one of her articles here. This is one I'm trying to make myself memorize.

By Dana Lynn Smith

Recently an author asked me "How do you stage an in-person book launch with a novel that's published as an ebook? How do you autograph a computer screen?"

Here are some suggestions for doing a live book launch event for an ebook:

Plan the event much like you would any other book launch party, except you will probably need to find a venue other than a bookstore. Try to use a venue that has some kind of tie-in with the book, and offer refreshments and perhaps some form of entertainment. See this article by Tolly Moseley for creative ideas on planning a book launch party.

Do a presentation based on the book's content, not just a signing where you sit at a table. Nonfiction authors can speak on their book's topic or plan an interactive activity based on the topic. Novelists can do a presentation based on some aspect of the book's story or do a short reading. Children's authors can read the book aloud, speak on the topic of the book, and plan fun activities for kids. All authors can talk about writing and publishing and take questions from the audience. Be creative and plan something interesting!

Print lots of bookmarks and handout several to all of the attendees so they can share with others. If you print your bookmarks with uncoated paper on the back side, you can sign the back of the bookmarks. See this article to learn more about using bookmarks for book promotion.

Encourage attendees to bring their ebook reading device to the event. They can download the ebook on the spot.  You could even provide a laptop computer where people can order the book if they don't have their ebook reader with them, but you'll need to make certain that each person logs out of their Amazon or other ebookstore account after using it.

You can "autograph" Kindle ebooks by using KindleGraph to send personalized inscriptions and signatures to the customer's Kindle ebook reader.

If your ebook is available on the Nook store, you may be able to arrange an event at a Barnes & Noble store. Last year B&N announced that they were going to offer autographing services for Nook Color devices, but it's hard to find any details on how to do it. Your local store event manager may have information on autographing.

Remember that you'll need to promote your event heavily. Suggested promotions include press releases to local media, emails or evites to your friends and local contacts, announcements on your blog and social media accounts, and postcard invitations. Ask others to help spread the word.
                                                         *      *     * 
Dana Lynn Smith, The Savvy Book Marketer, helps authors and indie publishers learn how to sell more books through her how-to guides, blog, newsletter, and private coaching. Get her free Top Book Marketing Tips ebook at www.BookMarketingNewsletter.com, visit her blog at www.TheSavvyBookMarketer.com, follow @BookMarketer on Twitter, and connect on Facebook at www.facebook.com/SavvyBookMarketer.
                                                         *     *     *     *     *     *
 Check out Elaine's web page or sign up for her newsletter