 computer file -- they are only visible in the online previewer (when the book is loaded to Kindle, via Amazon's KDP, or another online retailer).
Taking Out the Formatting
Rogue text and spacing can be avoided by taking formatting out of the computer file and reinserting it. Once a book has been taken through the "no formatting" step (using a a program such as Notepad in Microsoft Word) then you can begin to put the formatting back into the book.
If you skip the "take out the format" step you could spend hours trying to fix an uploaded book file. And you may never fully fix it all, so your book will look...weird. And it will annoy readers.
For info on taking out formatting, go to this post.
After you take the formatting out using Notepad (or whatever), you select the book, copy it, and put it back into your word processing program.
After you take the formatting out of a book try to work on it on just one computer -- the one you used when removing the formatting. I'm no technology guru, so I cannot tell you why transferring the file to another computer (or different word processing program) can mess it up, but it can.
Always remember, computers are dumb. They can only do what you tell them to do, which is why you need to provide good instructions.
Word Instructions to Reinsert Formatting
Save your new file in Word 97-2003 form (doc vs. docx). You can do this in later versions. It will not be obvious to the author that they are working in the older format.
Word 97-2003 does not have all the bells and whistles of newer versions, so it does not "mess with"
your manuscript as much as newer versions.
Here are specific steps.
1) Make a copy of your file and work on that copy. Never work on your only copy.
 2) If you have not already done so, make your document single-spaced and take out all spaces between paragraphs EXCEPT paragraphs that separate two scenes. (Yes, it takes awhile. You have to do it or you'll only get about ten lines per page on the e-readers.)
3) If you still have tabs, take them all out. Do this by doing a "find and replace." In the find you will put ^t --the symbol for a tab. (The carrot is usually above the 6 key). In the replace put nothing. Use "replace all." Eek! You have no way to tell if it's a new paragraph. No worries, keep reading.
Now you are ready to create the basic "style for your book."
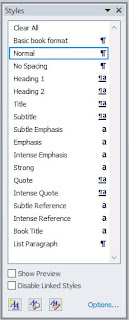
 4) From the tool bar, click on format and select "Styles and Formatting." You see a column on the right.
5) The white rectangular box at the top of the column needs to say "normal." If it does not , look at the top left of your toolbar. You'll see "AA" and next to that another white box. Click the down arrow and select Normal.
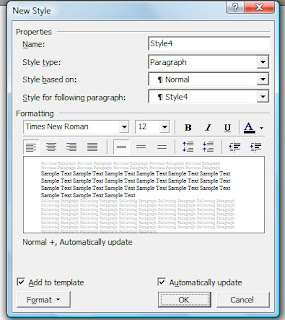
6) Back to AA at the bottom of "Styles and Formatting." Right click and click on "New Style."
7) In the top white box that appears, name your style, something you will remember, such as "book format" or basic book format.
8) Style type will remain "paragraph."
9) Style will remain based on "Normal."
10) Leave as "Style 1" in style for following paragraphs.
11) Below where it says "Formatting" is a box that shows the font you will use. I suggest something simple like Book Antiqua or Times New Roman. Leave fancy styles for your cover.
12) Font size does not matter too much, since an e-reader can make text bigger or smaller. I use Book Antiqua 11.
13) At the bottom put a check in "Add to template" and "Automatically Update."
14) At the bottom left, click on the tab that says "Format." The second item in the list that appears will be paragraph. Click on that.
15) At the top of the paragraph formatting box, make the outline level "body text" and alignment "justified." (Left justified looks sloppy in an e-reader, but it's your choice.)
16) Leave all zeroes for the "indentation" and "spacing."
17) Under line spacing make it single and leave the white box next to it white.
18) "Special" -- use the drop down arrow and select first line. To the right, I suggest .3 for the indent amount. (Your choice, but on an e-reader .5 looks huge.) Now the reader can see your paragraphs.
19) Click Okay (at the bottom). This take you back to the "New Style" screen, shown above.
20) Click Okay (at the bottom).
21) The blue box will disappear and on the right the style and formatting menu will now have a style with the name you just gave your style -- book format or whatever.
Here is where all of what you just did is worth it.
22) For practice. Select (highlight) a few paragraphs and click on the style you just created. The paragraphs you selected will be indented .3 (or whatever you chose) and will have the font you selected, etc.
Now what?
You have a choice. I select the entire book and click on whatever I named the book format style set. Then SAVE the book, maybe giving it today's date.
Then I add back centering for chapters. I add back centering by selecting the line of the chapter head (or anything else) and then click "clear formatting." Then I highlight the chapter heading and select center and the font size I want.
I add bold and italics by selecting the text and clicking on bold or italics, as in any document.
Adding bold and centering this way DOES NOT always work well, but 99% of the time it does.
Mark Coker, who wrote the Smashwords Style Guide, suggests that you create a few more new styles, just as you did for your basic book format. For example, for a chapter name, a style might be centered, a slightly larger font, and bold. You would then select the chapter name and click on that new style, which you might have named "Chapter Name" (or something like that).
My guess is that for newer versions of Word it is more important to create the separate styles, and it only takes a minute once you have done it for the first time. You could create a style called "front page matter" and have it centered, and in a different font. You can create 25 styles if you like.
Is this tedious as all get out? Yes. Be assured it takes less time than not doing this. And you are a publisher, so you cannot expect it to be a total piece of cake.
After doing this, you should have a file you can upload and have few problems with. The good thing about uploading to sites such as Smashwords, Kindle (Amazon), or Nook (Barnes and Noble) is that after you upload they give you a simple way to page through your book as it will look on the e-reader. This is not a time to proof (you did that already), but it does let you see if you have extra spaces somewhere, or an odd font. You can fix that and reload the book.
One final thought. When you load to Kindle or Smashwords (which puts your books on Apple, Kobo, and other sites) you can have page breaks between chapters. If you load directly to Nook Press (the Barnes and Noble publishing site) you can only use section breaks.
Do You Really Have to Do All This?
Maybe not. Amazon continues to improve its processes, and I have tried loading files without doing all these steps. I start by saving the file in Word 1997-2003, removing tabs, and replacing them with indents (using the paragraph formatting guides described above).
My caution would be that there can still be rogue formatting errors, which will appear when you preview the text in the Amazon previewer. You can correct these and reload.
The reason I still do the full process described here is that you don't know what those rogue formatting errors will be, or which you don't see. The process described here will take only an hour or two (depending on the book's length), and when you are done the book has no formatting errors.
Onward and upward. (This post was updated in 2017.)
* * * *
Check out Elaine's web page or sign up for her newsletter
No comments:
Post a Comment